Tujuan
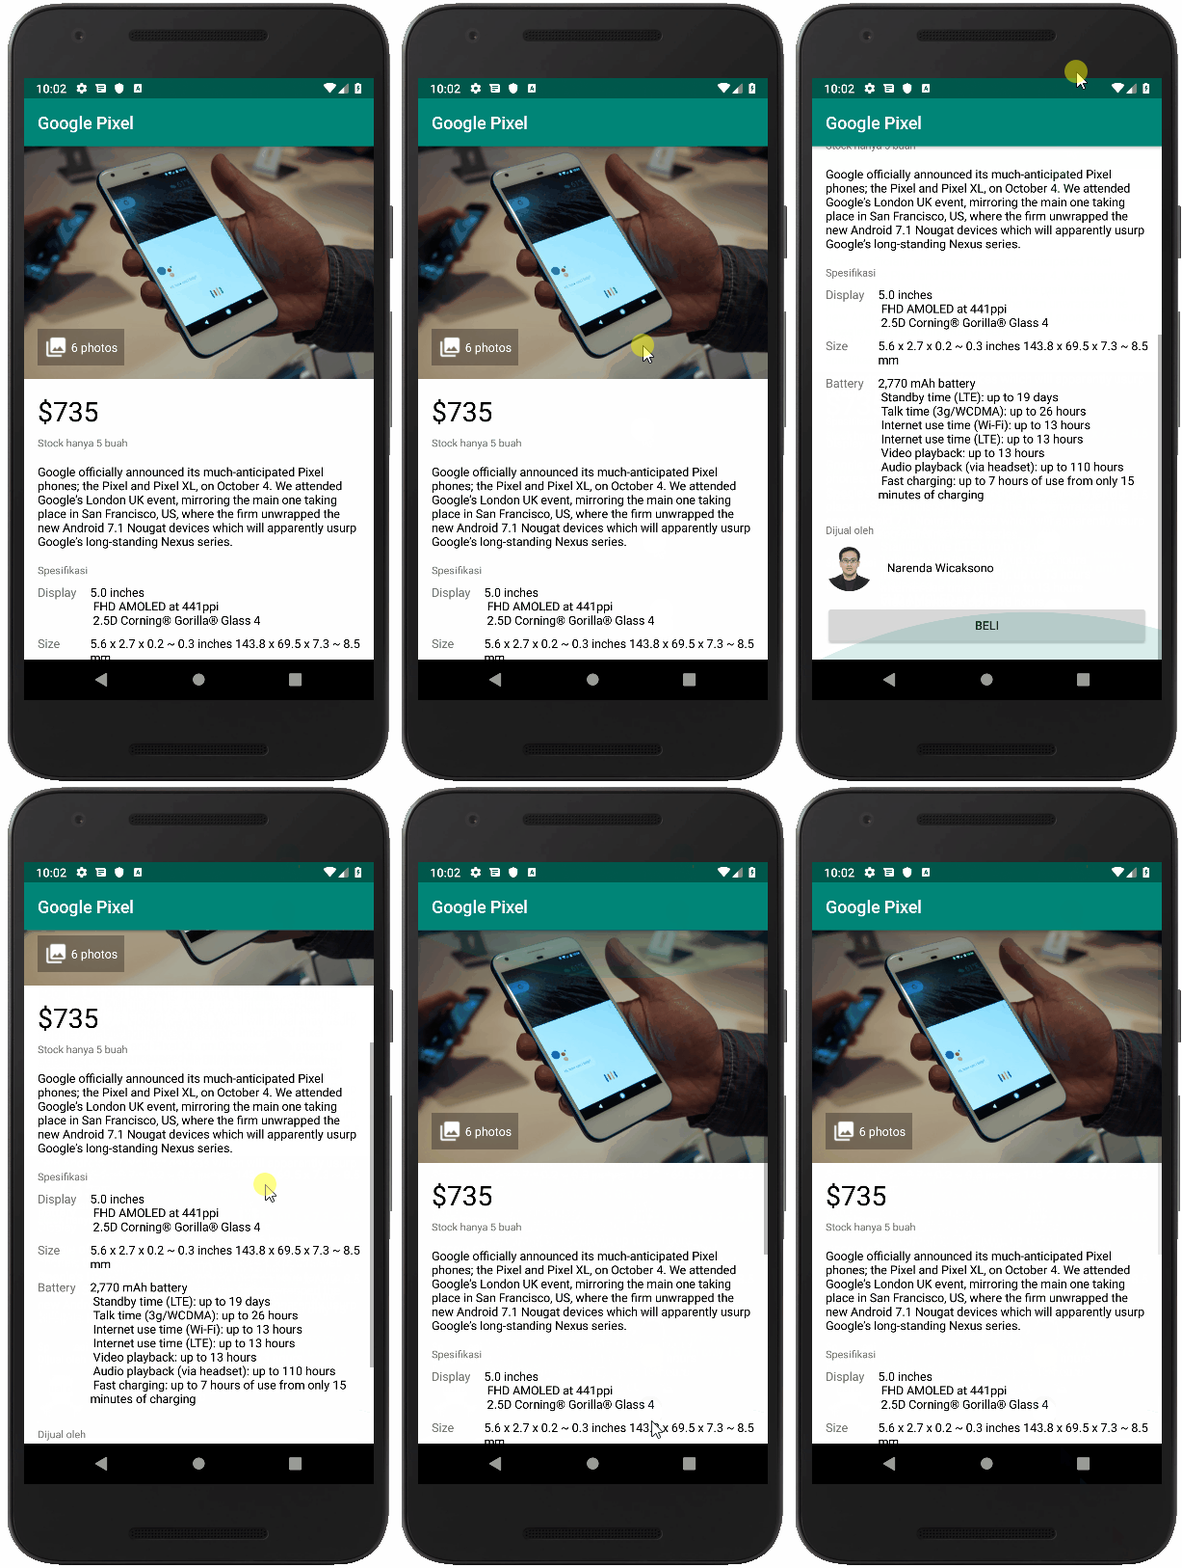
Pada latihan kali ini Anda akan mengembangkan sebuah halaman detail yang di dalamnya terdiri dari beberapa komponen View dan ViewGroup Layout. Tampilan akhir aplikasi akan seperti ini:

Logika
Menjalankan Aplikasi menampilkan tampilan (tampilan akan sesuai dengan apa yang dibuat di layout editor).
Codelab Views and ViewGroup
- Buat Project baru di Android Studio dengan kriteria sebagai berikut:
Nama Project MyViewAndViews Target & Minimum Target SDK Phone and Tablet, Api level 21 Tipe Activity Empty Activity Activity Name MainActivity Use AndroidX Artifact True Language Kotlin/Java - Lalu buka berkas build.gradle (Module: app) dan tambahkan satu baris ini di bagian dependecies:
implementation 'de.hdodenhof:circleimageview:3.0.0'
Sehingga berkas build.gradle(Module: app) kita sekarang menjadi seperti ini:Kotlin apply plugin: 'com.android.application'
apply plugin: 'kotlin-android-extensions'
apply plugin: 'kotlin-android'
android {
compileSdkVersion 29
buildToolsVersion '29.0.1'
defaultConfig {
applicationId "com.dicoding.picodiploma.myviewandviews"
minSdkVersion 21
targetSdkVersion 29
versionCode 1
versionName "1.0"
testInstrumentationRunner "androidx.test.runner.AndroidJUnitRunner"
}
buildTypes {
release {
minifyEnabled false
proguardFiles getDefaultProguardFile('proguard-android.txt'), 'proguard-rules.pro'
}
}
}
dependencies {
implementation fileTree(dir: 'libs', include: ['*.jar'])
androidTestImplementation('androidx.test.espresso:espresso-core:3.1.0', {
exclude group: 'com.android.support', module: 'support-annotations'
})
implementation 'androidx.appcompat:appcompat:1.1.0'
implementation 'androidx.vectordrawable:vectordrawable-animated:1.1.0'
testImplementation 'junit:junit:4.12'
implementation "androidx.core:core-ktx:1.0.2"
implementation "org.jetbrains.kotlin:kotlin-stdlib-jdk7:$kotlin_version"
implementation 'de.hdodenhof:circleimageview:3.0.0'
}Java apply plugin: 'com.android.application'
android {
compileSdkVersion 29
defaultConfig {
applicationId "com.dicoding.picodiploma.myviewandviews"
minSdkVersion 21
targetSdkVersion 29
versionCode 1
versionName "1.0"
testInstrumentationRunner "androidx.test.runner.AndroidJUnitRunner"
}
buildTypes {
release {
minifyEnabled false
proguardFiles getDefaultProguardFile('proguard-android.txt'), 'proguard-rules.pro'
}
}
}
dependencies {
implementation fileTree(dir: 'libs', include: ['*.jar'])
androidTestImplementation('androidx.test.espresso:espresso-core:3.1.0', {
exclude group: 'com.android.support', module: 'support-annotations'
})
implementation 'androidx.appcompat:appcompat:1.1.0'
implementation 'androidx.vectordrawable:vectordrawable-animated:1.1.0'
testImplementation 'junit:junit:4.12'
implementation 'de.hdodenhof:circleimageview:3.0.0'
} -
Lalu buka berkas strings.xml di res → values. Sesuaikan isinya dengan seperti ini:
<resources>
    <string name="app_name">MyViewAndViews</string>
    <string name="content_text">Google officially announced its much-anticipated Pixel phones; the Pixel and Pixel XL, on October 4. We attended Google’s London UK event, mirroring the main one taking place in San Francisco, US, where the firm unwrapped the new Android 7.1 Nougat devices which will apparently usurp Google’s long-standing Nexus series.</string>
    <string name="content_specs_display">5.0 inchesn
    FHD AMOLED at 441ppin
    2.5D Corning® Gorilla® Glass 4</string>
    <string name="content_specs_size">5.6 x 2.7 x 0.2 ~ 0.3 inches 143.8 x 69.5 x 7.3 ~ 8.5 mm</string>
    <string name="content_specs_battery">2,770 mAh batteryn
    Standby time (LTE): up to 19 daysn
    Talk time (3g/WCDMA): up to 26 hoursn
    Internet use time (Wi-Fi): up to 13 hoursn
    Internet use time (LTE): up to 13 hoursn
    Video playback: up to 13 hoursn
    Audio playback (via headset): up to 110 hoursn
    Fast charging: up to 7 hours of use from only 15 minutes of charging</string>
</resources> -
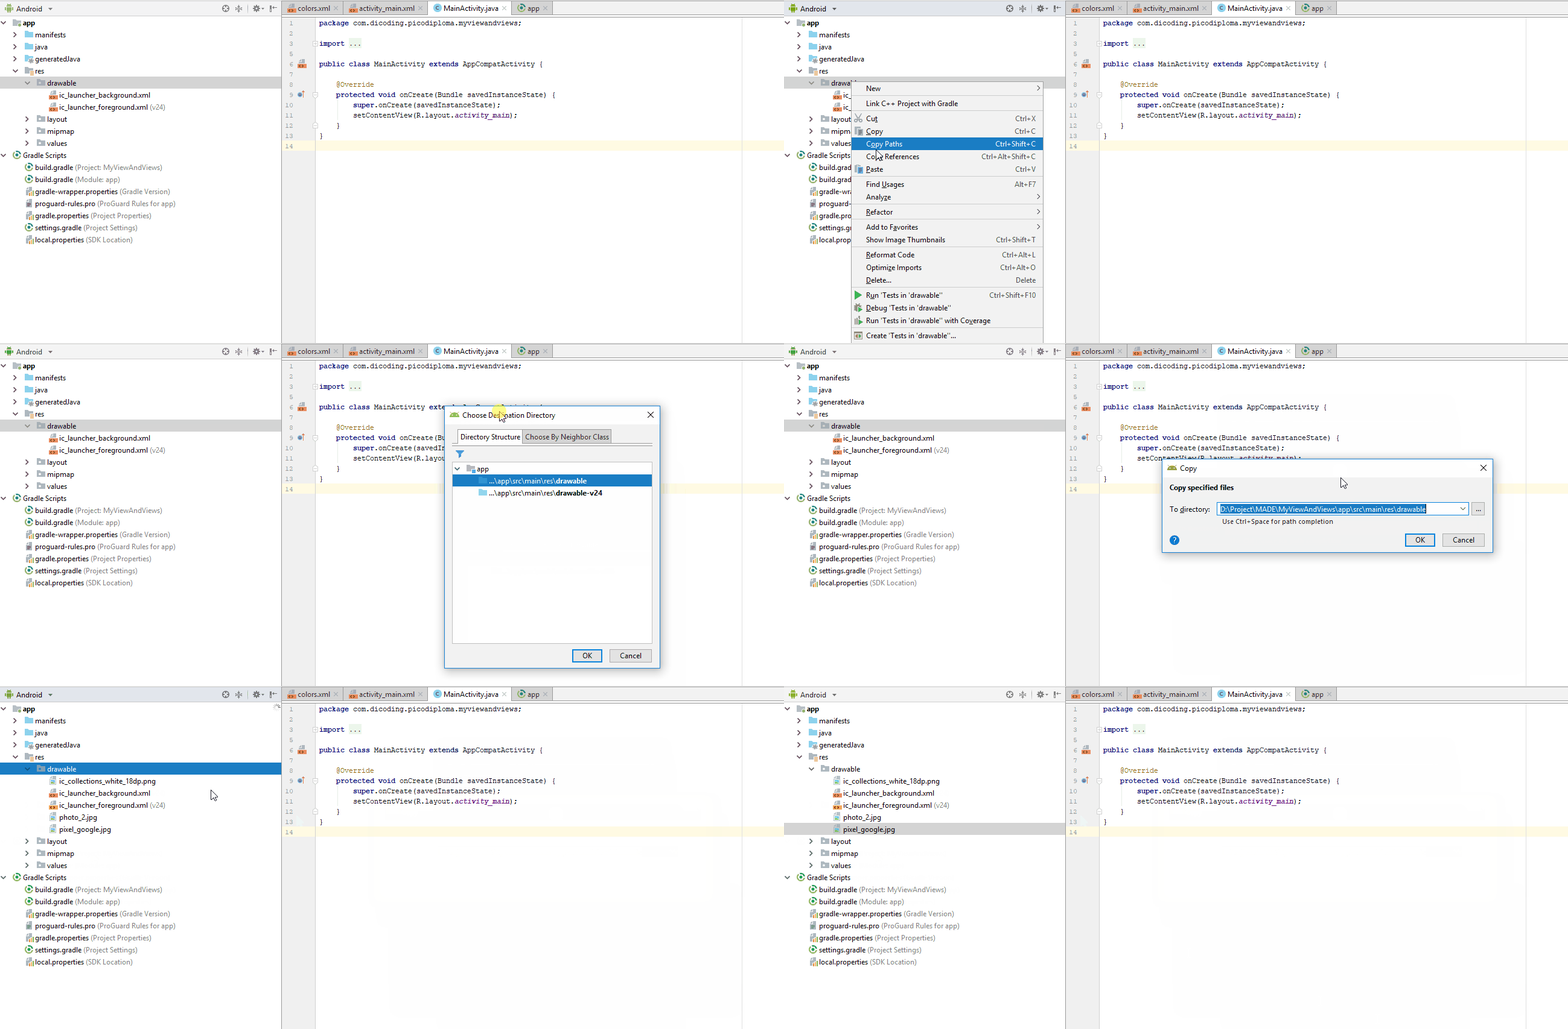
Selanjutnya, unduh asset-nya di sini. Bila telah selesai, salin semua asset yang dibutuhkan ke dalam direktori res → drawable.

-
Buka berkas activity_main.xml dan ubah layout utama menjadi seperti ini:
<?xml version="1.0" encoding="utf-8"?>
<ScrollView xmlns:android="http://schemas.android.com/apk/res/android"
    xmlns:tools="http://schemas.android.com/tools"
    android:id="@+id/activity_main"
    android:layout_width="match_parent"
    android:layout_height="match_parent"
    android:background="@android:color/white"
    tools:context="com.dicoding.myviewandviews.MainActivity">

</ScrollView> - Kemudian tambahkan layout utama di dalam ScrollView.
<?xml version="1.0" encoding="utf-8"?>
<ScrollView xmlns:android="http://schemas.android.com/apk/res/android"
    xmlns:tools="http://schemas.android.com/tools"
    android:id="@+id/activity_main"
    android:layout_width="match_parent"
    android:layout_height="match_parent"
    android:background="@android:color/white"
    tools:context="com.dicoding.picodiploma.myviewandviews.MainActivity">
    <LinearLayout
        android:layout_width="match_parent"
        android:layout_height="wrap_content"
        android:orientation="vertical">

    </LinearLayout>
</ScrollView> - Kemudian kita masukkan komponen di dalam LinearLayout yang sudah ditambahkan sebelumnya.
<?xml version="1.0" encoding="utf-8"?>
<ScrollView xmlns:android="http://schemas.android.com/apk/res/android"
    xmlns:tools="http://schemas.android.com/tools"
    android:id="@+id/activity_main"
    android:layout_width="match_parent"
    android:layout_height="match_parent"
    android:background="@android:color/white"
    tools:context="com.dicoding.picodiploma.myviewandviews.MainActivity">
    <LinearLayout
        android:layout_width="match_parent"
        android:layout_height="wrap_content"
        android:orientation="vertical">
        <FrameLayout
            android:layout_width="match_parent"
            android:layout_height="wrap_content">
            <ImageView
                android:layout_width="match_parent"
                android:layout_height="wrap_content"
                android:adjustViewBounds="true"
                android:src="@drawable/pixel_google"
                android:scaleType="fitXY"/>
            <TextView
                android:layout_width="wrap_content"
                android:layout_height="wrap_content"
                android:padding="8dp"
                android:text="6 Photos"
                android:gravity="center_vertical"
                android:drawableLeft="@drawable/ic_collections_white_18dp"
                android:drawablePadding="4dp"
                android:textAppearance="@style/TextAppearance.AppCompat.Small"
                android:background="#4D000000"
                android:textColor="@android:color/white"
                android:layout_marginLeft="16dp"
                android:layout_marginBottom="16dp"
                android:layout_gravity="bottom" />
        </FrameLayout>
    </LinearLayout>
</ScrollView>
Tampilan saat ini adalah seperti ini:
- Selanjutnya, tambahkan textview di bawah FrameLayout, menjadi seperti ini:
<?xml version="1.0" encoding="utf-8"?>
<ScrollView xmlns:android="http://schemas.android.com/apk/res/android"
    xmlns:tools="http://schemas.android.com/tools"
    android:id="@+id/activity_main"
    android:layout_width="match_parent"
    android:layout_height="match_parent"
    android:background="@android:color/white"
    tools:context="com.dicoding.picodiploma.myviewandviews.MainActivity">
    <LinearLayout
        android:layout_width="match_parent"
        android:layout_height="wrap_content"
        android:orientation="vertical">
        <FrameLayout ...>

        <TextView
            android:layout_width="match_parent"
            android:layout_height="wrap_content"
            android:textSize="32sp"
            android:text="$735"
            android:layout_marginLeft="16dp"
            android:layout_marginRight="16dp"
            android:layout_marginTop="16dp"
            android:layout_marginBottom="8dp"
            android:textColor="@android:color/black"/>
        <TextView
            android:layout_width="match_parent"
            android:layout_height="wrap_content"
            android:text="Stock hanya 5 buah"
            android:textSize="12sp"
            android:layout_marginLeft="16dp"
            android:layout_marginRight="16dp"
            android:layout_marginBottom="16dp"/>
        <TextView
            android:layout_width="match_parent"
            android:layout_height="wrap_content"
            android:text="@string/content_text"
            android:layout_marginLeft="16dp"
            android:layout_marginRight="16dp"
            android:layout_marginBottom="16dp"
            android:lineSpacingMultiplier="1"
            android:textColor="@android:color/black"/>
    </LinearLayout>
</ScrollView>
Tampilan saat ini adalah:
- Setelah menambahkan beberapa textview, selanjutnya kita akan menambahkan tablelayout.
<?xml version="1.0" encoding="utf-8"?>
<ScrollView xmlns:android="http://schemas.android.com/apk/res/android"
    xmlns:tools="http://schemas.android.com/tools"
    android:id="@+id/activity_main"
    android:layout_width="match_parent"
    android:layout_height="match_parent"
    android:background="@android:color/white"
    tools:context="com.dicoding.picodiploma.myviewandviews.MainActivity">
    <LinearLayout
        android:layout_width="match_parent"
        android:layout_height="wrap_content"
        android:orientation="vertical">
        <FrameLayout ...>
        <TextView ...>
        <TextView ...>
        <TextView ...>

        <TextView
            android:layout_width="match_parent"
            android:layout_height="wrap_content"
            android:text="Spesifikasi"
            android:textSize="12sp"
            android:layout_marginLeft="16dp"
            android:layout_marginRight="16dp"
            android:layout_marginBottom="8dp"/>
        <TableLayout
            android:layout_width="match_parent"
            android:layout_height="wrap_content"
            android:layout_marginLeft="16dp"
            android:layout_marginRight="16dp"
            android:layout_marginBottom="16dp">
            <TableRow
                android:layout_width="match_parent"
                android:layout_height="wrap_content"
                android:layout_marginBottom="8dp">
                <TextView
                    android:layout_width="wrap_content"
                    android:layout_height="wrap_content"
                    android:textSize="14sp"
                    android:layout_marginRight="16dp"
                    android:text="Display"/>
                <TextView
                    android:layout_width="match_parent"
                    android:layout_height="wrap_content"
                    android:textSize="14sp"
                    android:layout_weight="1"
                    android:text="@string/content_specs_display"
                    android:textColor="@android:color/black"/>
            </TableRow>
            <TableRow
                android:layout_width="match_parent"
                android:layout_height="wrap_content"
                android:layout_marginBottom="8dp">
                <TextView
                    android:layout_width="wrap_content"
                    android:layout_height="wrap_content"
                    android:textSize="14sp"
                    android:layout_marginRight="16dp"
                    android:text="Size"/>
                <TextView
                    android:layout_width="match_parent"
                    android:layout_height="wrap_content"
                    android:textSize="14sp"
                    android:layout_weight="1"
                    android:text="@string/content_specs_size"
                    android:textColor="@android:color/black"/>
            </TableRow>
            <TableRow
                android:layout_width="match_parent"
                android:layout_height="wrap_content"
                android:layout_marginBottom="8dp">
                <TextView
                    android:layout_width="wrap_content"
                    android:layout_height="wrap_content"
                    android:textSize="14sp"
                    android:layout_marginRight="16dp"
                    android:text="Battery"/>
                <TextView
                    android:layout_width="match_parent"
                    android:layout_height="wrap_content"
                    android:textSize="14sp"
                    android:layout_weight="1"
                    android:text="@string/content_specs_battery"
                    android:textColor="@android:color/black"/>
            </TableRow>
        </TableLayout>
    </LinearLayout>
</ScrollView>
Tampilan saat ini adalah seperti berikut:

- Kemudian setelah menambahkan tablelayout, kita masukkan viewgroup lagi. Tambahkan relativelayout dan button di bawah TableLayout menjadi seperti ini:
<?xml version="1.0" encoding="utf-8"?>
<ScrollView xmlns:android="http://schemas.android.com/apk/res/android"
    xmlns:tools="http://schemas.android.com/tools"
    android:id="@+id/activity_main"
    android:layout_width="match_parent"
    android:layout_height="match_parent"
    android:background="@android:color/white"
    tools:context="com.dicoding.picodiploma.myviewandviews.MainActivity">
    <LinearLayout
        android:layout_width="match_parent"
        android:layout_height="wrap_content"
        android:orientation="vertical">
        <FrameLayout ...>
        <TextView ...>
        <TextView ...>
        <TextView ...>
        <TextView ...>
        <TableLayout ...>

        <TextView
            android:layout_width="match_parent"
            android:layout_height="wrap_content"
            android:text="Dijual oleh"
            android:textSize="12sp"
            android:layout_marginLeft="16dp"
            android:layout_marginRight="16dp"
            android:layout_marginBottom="8dp"/>
        <RelativeLayout
            android:layout_width="match_parent"
            android:layout_height="wrap_content"
            android:layout_marginLeft="16dp"
            android:layout_marginRight="16dp"
            android:layout_marginBottom="16dp">
            <de.hdodenhof.circleimageview.CircleImageView
                android:layout_width="56dp"
                android:layout_height="56dp"
                android:src="@drawable/photo_2"
                android:layout_centerVertical="true"
                android:id="@+id/profile_image"
                android:layout_marginRight="16dp"/>
            <TextView
                android:layout_width="match_parent"
                android:layout_height="wrap_content"
                android:layout_toRightOf="@id/profile_image"
                android:text="Narenda Wicaksono"
                android:textColor="@android:color/black"
                android:layout_centerVertical="true"/>
        </RelativeLayout>
        <Button
            android:layout_width="match_parent"
            android:layout_height="wrap_content"
            android:text="Beli"
            android:layout_marginLeft="16dp"
            android:layout_marginRight="16dp"
            android:layout_marginBottom="16dp"/>
    </LinearLayout>
</ScrollView> - Pada properties android:text akan ada warning yang berbunyi seperti di bawah ini.
Ini terjadi ketika kita hardcode (menuliskan teks string langsung pada view) pada android:text. Solusinya adalah tekan Alt + Enter pada isi dari android:text, dan akan muncul dialog seperti ini.
Kemudian pilihlah Extract string resource. Akan muncul dialog baru yang tampilannya seperti ini:
Kemudian tekan OK. Dialog tersebut secara otomatis akan menambahkan teks yang kita hardcode ke dalam res → values → strings.xml secara otomatis.
- Lakukan hal yang sama untuk semua warning di android:text pada seluruh view yang ada di activity_main.xml. Kemudian buka res → values → strings.xml, maka isi dari xml-nya akan menjadi seperti berikut:
<resources>
    <string name="app_name">MyViewAndViews</string>
    <string name="content_text">Google officially announced its much-anticipated Pixel phones; the Pixel and Pixel XL, on October 4. We attended Google’s London UK event, mirroring the main one taking place in San Francisco, US, where the firm unwrapped the new Android 7.1 Nougat devices which will apparently usurp Google’s long-standing Nexus series.</string>
    <string name="content_specs_display">5.0 inchesn
        FHD AMOLED at 441ppin
        2.5D Corning® Gorilla® Glass 4</string>
    <string name="content_specs_size">5.6 x 2.7 x 0.2 ~ 0.3 inches 143.8 x 69.5 x 7.3 ~ 8.5 mm</string>
    <string name="content_specs_battery">2,770 mAh batteryn
        Standby time (LTE): up to 19 daysn
        Talk time (3g/WCDMA): up to 26 hoursn
        Internet use time (Wi-Fi): up to 13 hoursn
        Internet use time (LTE): up to 13 hoursn
        Video playback: up to 13 hoursn
        Audio playback (via headset): up to 110 hoursn
        Fast charging: up to 7 hours of use from only 15 minutes of charging</string>
    <string name="stock">Stock hanya 5 buah</string>
    <string name="specification">Spesifikasi</string>
    <string name="display">Display</string>
    <string name="size">Size</string>
    <string name="battery">Battery</string>
    <string name="seller">Dijual oleh</string>
    <string name="my_name">Narenda Wicaksono</string>
    <string name="buy">Beli</string>
    <string name="dummy_value">$735</string>
    <string name="dummy_photos">6 photos</string>
</resources> -
Maka setelah setiap teks yang dipindahkan ke string.xml, activity_main.xml menjadi sepert ini:
<?xml version="1.0" encoding="utf-8"?>
<ScrollView xmlns:android="http://schemas.android.com/apk/res/android"
    xmlns:tools="http://schemas.android.com/tools"
    android:id="@+id/activity_main"
    android:layout_width="match_parent"
    android:layout_height="match_parent"
    android:background="@android:color/white"
    tools:context="com.dicoding.picodiploma.myviewandviews.MainActivity">

    <LinearLayout
        android:layout_width="match_parent"
        android:layout_height="wrap_content"
        android:orientation="vertical">

        <FrameLayout
            android:layout_width="match_parent"
            android:layout_height="wrap_content">

            <ImageView
                android:layout_width="match_parent"
                android:layout_height="wrap_content"
                android:adjustViewBounds="true"
                android:scaleType="fitXY"
                android:src="@drawable/pixel_google" />

            <TextView
                android:layout_width="wrap_content"
                android:layout_height="wrap_content"
                android:layout_gravity="bottom"
                android:layout_marginStart="16dp"
                android:layout_marginBottom="16dp"
                android:background="#4D000000"
                android:drawableStart="@drawable/ic_collections_white_18dp"
                android:drawablePadding="4dp"
                android:gravity="center_vertical"
                android:padding="16dp"
                android:text="@string/dummy_photos"
                android:textAppearance="@style/TextAppearance.AppCompat.Small"
                android:textColor="@android:color/white" />
        </FrameLayout>

        <TextView
            android:layout_width="match_parent"
            android:layout_height="wrap_content"
            android:layout_marginLeft="16dp"
            android:layout_marginTop="16dp"
            android:layout_marginRight="16dp"
            android:layout_marginBottom="16dp"
            android:text="@string/dummy_value"
            android:textColor="@android:color/black"
            android:textSize="32sp" />

        <TextView
            android:layout_width="match_parent"
            android:layout_height="wrap_content"
            android:layout_marginLeft="16dp"
            android:layout_marginRight="16dp"
            android:layout_marginBottom="16dp"
            android:text="@string/stock"
            android:textSize="12sp" />

        <TextView
            android:layout_width="match_parent"
            android:layout_height="wrap_content"
            android:layout_marginLeft="16dp"
            android:layout_marginRight="16dp"
            android:layout_marginBottom="16dp"
            android:lineSpacingMultiplier="1"
            android:text="@string/content_text"
            android:textColor="@android:color/black" />

        <TextView
            android:layout_width="match_parent"
            android:layout_height="wrap_content"
            android:layout_marginLeft="16dp"
            android:layout_marginRight="16dp"
            android:layout_marginBottom="16dp"
            android:text="@string/specification"
            android:textSize="12sp" />

        <TableLayout
            android:layout_width="match_parent"
            android:layout_height="wrap_content"
            android:layout_marginLeft="16dp"
            android:layout_marginRight="16dp"
            android:layout_marginBottom="16dp">

            <TableRow
                android:layout_width="match_parent"
                android:layout_height="wrap_content"
                android:layout_marginBottom="16dp">

                <TextView
                    android:layout_width="wrap_content"
                    android:layout_height="wrap_content"
                    android:layout_marginEnd="16dp"
                    android:text="@string/display"
                    android:textSize="14sp" />

                <TextView
                    android:layout_width="match_parent"
                    android:layout_height="wrap_content"
                    android:layout_weight="1"
                    android:text="@string/content_specs_display"
                    android:textColor="@android:color/black"
                    android:textSize="14sp" />
            </TableRow>

            <TableRow
                android:layout_width="match_parent"
                android:layout_height="wrap_content"
                android:layout_marginBottom="16dp">

                <TextView
                    android:layout_width="wrap_content"
                    android:layout_height="wrap_content"
                    android:layout_marginEnd="16dp"
                    android:text="@string/size"
                    android:textSize="14sp" />

                <TextView
                    android:layout_width="match_parent"
                    android:layout_height="wrap_content"
                    android:layout_weight="1"
                    android:text="@string/content_specs_size"
                    android:textColor="@android:color/black"
                    android:textSize="14sp" />
            </TableRow>

            <TableRow
                android:layout_width="match_parent"
                android:layout_height="wrap_content"
                android:layout_marginBottom="16dp">

                <TextView
                    android:layout_width="wrap_content"
                    android:layout_height="wrap_content"
                    android:layout_marginEnd="16dp"
                    android:text="@string/battery"
                    android:textSize="14sp" />

                <TextView
                    android:layout_width="match_parent"
                    android:layout_height="wrap_content"
                    android:layout_weight="1"
                    android:text="@string/content_specs_battery"
                    android:textColor="@android:color/black"
                    android:textSize="14sp" />
            </TableRow>
        </TableLayout>

        <TextView
            android:layout_width="match_parent"
            android:layout_height="wrap_content"
            android:layout_marginLeft="16dp"
            android:layout_marginRight="16dp"
            android:layout_marginBottom="16dp"
            android:text="@string/seller"
            android:textSize="12sp" />

        <RelativeLayout
            android:layout_width="match_parent"
            android:layout_height="wrap_content"
            android:layout_marginLeft="16dp"
            android:layout_marginRight="16dp"
            android:layout_marginBottom="16dp">

            <de.hdodenhof.circleimageview.CircleImageView
                android:id="@+id/profile_image"
                android:layout_width="56dp"
                android:layout_height="56dp"
                android:layout_centerVertical="true"
                android:layout_marginEnd="16dp"
                android:src="@drawable/photo_2" />

            <TextView
                android:layout_width="match_parent"
                android:layout_height="wrap_content"
                android:layout_centerVertical="true"
                android:layout_toEndOf="@+id/profile_image"
                android:text="@string/my_name"
                android:textColor="@android:color/black" />
        </RelativeLayout>

        <Button
            android:layout_width="match_parent"
            android:layout_height="wrap_content"
            android:layout_marginLeft="16dp"
            android:layout_marginRight="16dp"
            android:layout_marginBottom="16dp"
            android:text="@string/buy" />
    </LinearLayout>
</ScrollView> -
Terakhir, pada MainActivity tambahkan beberapa baris kode berikut:
Kotlin if (supportActionBar != null) {
(supportActionBar as ActionBar).title = "Google Pixel"
}Dengan kotlin, Anda juga bisa menyingkatnya menjadi:
supportActionBar?.title = "Google Pixel"
Java if (getSupportActionBar() != null) {
getSupportActionBar().setTitle("Google Pixel");
}Sehingga kode yang ada di MainActivity menjadi seperti berikut:Kotlin class MainActivity : AppCompatActivity() {
override fun onCreate(savedInstanceState: Bundle?) {
super.onCreate(savedInstanceState)
setContentView(R.layout.activity_main)
if (supportActionBar != null) {
    (supportActionBar as ActionBar).title = "Google Pixel"
}
}
}Dengan kotlin, Anda juga bisa menyingkatnya menjadi:
class MainActivity : AppCompatActivity() {
override fun onCreate(savedInstanceState: Bundle?) {
super.onCreate(savedInstanceState)
setContentView(R.layout.activity_main)
supportActionBar?.title = "Google Pixel"
}
}Java public class MainActivity extends AppCompatActivity {
@Override
protected void onCreate(Bundle savedInstanceState) {
super.onCreate(savedInstanceState);
setContentView(R.layout.activity_main);
if (getSupportActionBar() != null) {
    getSupportActionBar().setTitle("Google Pixel");
}
}
} -
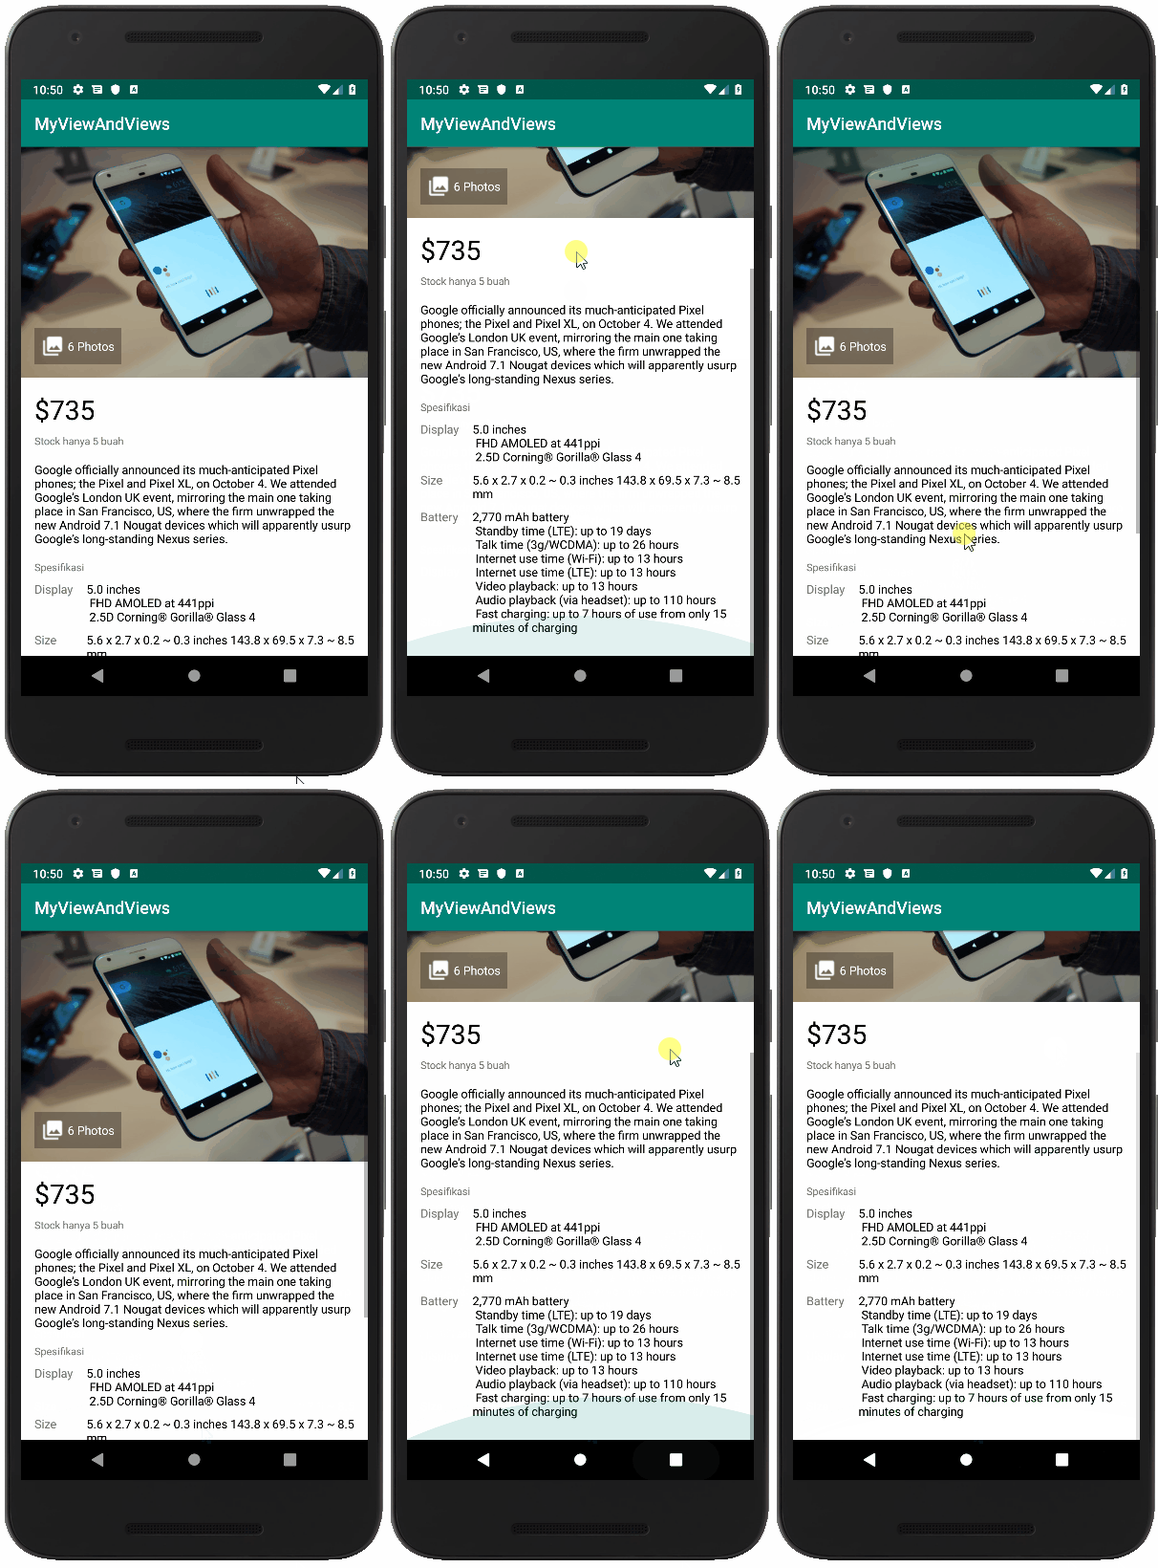
Sekarang silakan jalankan aplikasinya. Seharusnya hasilnya seperti ini:

Bedah Kode
Tidak ada yang rumit di bagian ini karena Anda hanya berhadapan dengan cara membentuk sebuah tampilan aplikasi android yang bagus di berkas layout xml.
CircleImageView
Di awal kita melakukan penambahan dependensi untuk menampilkan sebuah custom ImageView dalam bentuk lingkaran. Library yang digunakan adalah CircleImageView yang dibuat oleh Henning Dodenhoff. Library ini cukup populer dan selalu dikelola dengan baik.
implementation 'de.hdodenhof:circleimageview:3.0.0'
Strings.xml
Selanjutnya, kita akan menambahkan variabel-variabel konstan yang ditulis di dalam berkas strings.xml. Tujuannya agar teks yang sama tidak ditulis dua kali, baik itu di berkas activity maupun berkas xml.
<resources>
    <string name="app_name">MyViewAndViews</string>
    <string name="content_text">Google officially announced its much-anticipated Pixel phones; the Pixel and Pixel XL, on October 4. We attended Google’s London UK event, mirroring the main one taking place in San Francisco, US, where the firm unwrapped the new Android 7.1 Nougat devices which will apparently usurp Google’s long-standing Nexus series.</string>
    <string name="content_specs_display">5.0 inchesn
        FHD AMOLED at 441ppin
        2.5D Corning® Gorilla® Glass 4</string>
    <string name="content_specs_size">5.6 x 2.7 x 0.2 ~ 0.3 inches 143.8 x 69.5 x 7.3 ~ 8.5 mm</string>
    <string name="content_specs_battery">2,770 mAh batteryn
        Standby time (LTE): up to 19 daysn
        Talk time (3g/WCDMA): up to 26 hoursn
        Internet use time (Wi-Fi): up to 13 hoursn
        Internet use time (LTE): up to 13 hoursn
        Video playback: up to 13 hoursn
        Audio playback (via headset): up to 110 hoursn
        Fast charging: up to 7 hours of use from only 15 minutes of charging</string>
    <string name="stock">Stock hanya 5 buah</string>
    <string name="specification">Spesifikasi</string>
    <string name="display">Display</string>
    <string name="size">Size</string>
    <string name="battery">Battery</string>
    <string name="seller">Dijual oleh</string>
    <string name="my_name">Narenda Wicaksono</string>
    <string name="buy">Beli</string>
    <string name="dummy_value">$735</string>
    <string name="dummy_photos">6 photos</string>
</resources>
Bila diperhatikan, jika kita ingin menampilkan teks ‘content_specs_size’, kita hanya perlu menuliskan nama atribut di dalam obyek textview yang diinginkan.
<TextView
    android:layout_width="match_parent"
    android:layout_height="wrap_content"
    android:textSize="14sp"
    android:layout_weight="1"
    android:text="@string/content_specs_size"
    android:textColor="@android:color/black"/>
Dengan memanfaatkan strings.xml, Anda akan lebih mudah membuat aplikasi yang mendukung lebih dari satu bahasa.
View dan ViewGroup
Pembahasan mengenai Activity sebelumnya akan memudahkan Anda untuk memahami atribut dan namespace yang digunakan pada berkas layout xml. Anda dapat membaca kembali topik activity bila ada bagian yang Anda lupa.
<ScrollView xmlns:android="http://schemas.android.com/apk/res/android"
    xmlns:tools="http://schemas.android.com/tools"
    android:id="@+id/activity_main"
    android:layout_width="match_parent"
    android:layout_height="match_parent"
    android:background="@android:color/white"
    tools:context="com.dicoding.myviewandviews.MainActivity">

    ...
</ScrollView>
Ingat, semua komponen view dan viewgroup memiliki dua buah atribut penting yang harus selalu diberikan nilai untuk mengatur posisi dirinya di dalam sebuah layout, yaitu:
- layout_width
- layout_height
Kita akan menggunakan sebuah obyek scrollview yang akan menjadi root untuk tampilan halaman aplikasi. Kita menggunakan ScrollView sebagai root karena kita ingin halaman aplikasi bisa di-scroll ke bawah dan ke atas. Hal ini akan memudahkan pengguna untuk melihat tampilan secara menyeluruh.
<ScrollView xmlns:android="http://schemas.android.com/apk/res/android"
    xmlns:tools="http://schemas.android.com/tools"
    android:id="@+id/activity_main"
    android:layout_width="match_parent"
    android:layout_height="match_parent"
    android:background="@android:color/white"
    tools:context="com.dicoding.myviewandviews.MainActivity">
    <LinearLayout
        android:layout_width="match_parent"
        android:layout_height="wrap_content"
        android:orientation="vertical">
        ...
    </LinearLayout>
</ScrollView>
Seperti telah dijelaskan sebelumnya, scrollview hanya dapat memiliki satu layout viewgroup sebagai root untuk obyek view di dalamnya. Di sini susunan komponen view akan berorientasi vertikal.
<FrameLayout
    android:layout_width="match_parent"
    android:layout_height="wrap_content">

    <ImageView
        android:layout_width="match_parent"
        android:layout_height="wrap_content"
        android:adjustViewBounds="true"
        android:scaleType="fitXY"
        android:src="@drawable/pixel_google" />

    <TextView
        android:layout_width="wrap_content"
        android:layout_height="wrap_content"
        android:layout_gravity="bottom"
        android:layout_marginStart="16dp"
        android:layout_marginBottom="16dp"
        android:background="#4D000000"
        android:drawableStart="@drawable/ic_collections_white_18dp"
        android:drawablePadding="4dp"
        android:gravity="center_vertical"
        android:padding="16dp"
        android:text="@string/dummy_photos"
        android:textAppearance="@style/TextAppearance.AppCompat.Small"
        android:textColor="@android:color/white" />
</FrameLayout>
Gambar pixel_google yang tampil akan menjadi alas bagi obyek textview yang berada di atasnya. Ini seperti sifat dari komponen framelayout itu sendiri.
<TableLayout
    android:layout_width="match_parent"
    android:layout_height="wrap_content"
    android:layout_marginLeft="16dp"
    android:layout_marginRight="16dp"
    android:layout_marginBottom="16dp">

    <TableRow
        android:layout_width="match_parent"
        android:layout_height="wrap_content"
        android:layout_marginBottom="16dp">

        <TextView
            android:layout_width="wrap_content"
            android:layout_height="wrap_content"
            android:layout_marginEnd="16dp"
            android:text="@string/display"
            android:textSize="14sp" />

        <TextView
            android:layout_width="match_parent"
            android:layout_height="wrap_content"
            android:layout_weight="1"
            android:text="@string/content_specs_display"
            android:textColor="@android:color/black"
            android:textSize="14sp" />
    </TableRow>

    <TableRow
        android:layout_width="match_parent"
        android:layout_height="wrap_content"
        android:layout_marginBottom="16dp">

        <TextView
            android:layout_width="wrap_content"
            android:layout_height="wrap_content"
            android:layout_marginEnd="16dp"
            android:text="@string/size"
            android:textSize="14sp" />

        <TextView
            android:layout_width="match_parent"
            android:layout_height="wrap_content"
            android:layout_weight="1"
            android:text="@string/content_specs_size"
            android:textColor="@android:color/black"
            android:textSize="14sp" />
    </TableRow>

    <TableRow
        android:layout_width="match_parent"
        android:layout_height="wrap_content"
        android:layout_marginBottom="16dp">

        <TextView
            android:layout_width="wrap_content"
            android:layout_height="wrap_content"
            android:layout_marginEnd="16dp"
            android:text="@string/battery"
            android:textSize="14sp" />

        <TextView
            android:layout_width="match_parent"
            android:layout_height="wrap_content"
            android:layout_weight="1"
            android:text="@string/content_specs_battery"
            android:textColor="@android:color/black"
            android:textSize="14sp" />
    </TableRow>
</TableLayout>
Kita menggunakan TableLayout untuk menampilkan informasi spesifikasi. TableLayout yang kita gunakan sangatlah sederhana, tidak ada garis pembatas untuk kolom dan baris bahkan cell-nya.
Hanya dengan menggunakan tablerow kita bisa menambahkan sebuah baris baru di dalam sebuah tablelayout.
Hanya dengan menggunakan tablerow kita bisa menambahkan sebuah baris baru di dalam sebuah tablelayout.
<RelativeLayout
    android:layout_width="match_parent"
    android:layout_height="wrap_content"
    android:layout_marginLeft="16dp"
    android:layout_marginRight="16dp"
    android:layout_marginBottom="16dp">

    <de.hdodenhof.circleimageview.CircleImageView
        android:id="@+id/profile_image"
        android:layout_width="56dp"
        android:layout_height="56dp"
        android:layout_centerVertical="true"
        android:layout_marginEnd="16dp"
        android:src="@drawable/photo_2" />

    <TextView
        android:layout_width="match_parent"
        android:layout_height="wrap_content"
        android:layout_centerVertical="true"
        android:layout_toEndOf="@+id/profile_image"
        android:text="@string/my_name"
        android:textColor="@android:color/black" />
</RelativeLayout>
Selanjutnya, kita menggunakan sebuah relativelayout untuk menampilkan sebuah gambar dan teks. Posisi dari teks mengacu ke sebelah kanan dari image dan posisi keduanya disesuaikan untuk berada di tengah secara vertikal.
| Kotlin |
if (supportActionBar != null) {
Dengan kotlin, Anda juga bisa menyingkatnya menjadi: supportActionBar?.title = "Google Pixel" |
| Java |
if (getSupportActionBar() != null) {
|
Baris di atas akan mengganti nilai dari judul halaman pada actionbar di dalam MainActivity. Kita menggunakan supportActionBar() karena kelas MainActivity inherit kepada appcompatactivity, yang merupakan kelas turunan activity. Kelas tersebut sudah menyediakan fasilitas komponen actionbar dan mendukung semua versi OS Android.
Selamat! Anda sudah mempelajari layout, view, dan viewgroup. Semakin sering Anda berlatih untuk mentransformasikan sebuah desain menjadi sebuah berkas layout xml, kemampuan Anda akan semakin meningkat.
Anda dapat mengunjungi tautan berikut untuk mendalami topik antar muka pada Android:
Source code bisa Anda dapatkan pada tautan berikut:
